SFTP Overview
Overview
This document should be used for sites who need to upload Spatial Cloud data. To achieve this there is a standardised process requiring an SQL Server database warehouse backup loaded to spatial cloud storage. This is then used to update configured site spatial cloud data consumed by IntraMaps Public, IntraMaps Enterprise, MapBuilder and other applications. Implementing this process requires a metadata table to be provided with the uploaded data warehouse to automate all aspects of the data update process.
As part of the Spatial Cloud Migration, a new sFTP connection will be built. This replaces the FTP functionality utilised with MapImage and the old environment.
A site needs to obtain the following details and provide these details to TechnologyOne. Once these details have been supplied, TechnologyOne will advise the site the sFTP infrastructure has been provisioned and files can commence to be uploaded to the cloud.
- Public key - see guide below on how to generate
- IP address of where the site will be connecting from
It is recommended that the naming convention is standardised for all sites when uploading the spatial database file.
To achieve this, when creating the database .BAK file name it "IntraMapsSpatialCloud.bak".
Once sFTP has been provisioned, the old FTP functionality is no longer required and can be shut down.
Considerations
- Files should be uploaded into the correct folders on the SFTP end point. These are identical to the legacy FTP; (Database, Spatial, Web)
- Spatial & Web files uploaded are moved every 5 minutes from the SFTP server into the client folders in the Spatial Cloud environment.
- Database files uploaded are moved nightly from the SFTP server into the client folders in the Spatial Cloud environment.
Installation Requirements
Sites provide the below:
- Install a SFTP client local to the site network (TechnologyOne has no preference on SFTP client. However, most sites in SaaS use either FileZilla or WinSCP)
- Generate a Public and Private key pair (openssh RSA format - min key length 2048) and provide the Public Key ONLY to TechnologyOne
- Confirm the public address of where the site SFTP client will be connecting from.
In return, TechnologyOne will provide:
- Confirmation that the SFTP service is setup and ready to be tested
- Connection details; connection address for the site SFTP client to connect to, username for connection & site private key should be used for authentication.
Site Requirements
1. Installing/ sourcing a SFTP client
Some SFTP clients are free to download and use, others are a paid for service. Sites should complete their own research on which SFTP client is suitable to be used with the TechnologyOne SaaS environments.
Example SFTP Client:
WinSCP can be downloaded from the following website
https://winscp.net/eng/download.php
Example scripts for uploading/downloading files:
https://winscp.net/eng/docs/scripts
https://winscp.net/eng/docs/script_upload_single_file
2. Generating SSH and SFTP Key Pairs
The following process should be completed by users of SSH and SFTP services. It provides a highly secure way of securing access to these services.
To ensure security, a user should never share their private key with anyone including server administrators.
For Linux / Mac Users
- Open a terminal session
- Run the following command where <filename> is the path and name where the keys are to be saved and <password> is an optional password used to encrypt the private key. If you do not wish to include a password with the private key, omit the -P option. The files can be moved after this process has been completed. This will generate a 2048bit RSA 2 key pair. ssh-keygen -t rsa -f <filename> -P <password>
- Two files will be created. The file with the .pub extension can be shared with server administrators. The other file is your private key and should not be shared with anyone.
Make sure it is stored in a secure location.
For Windows Users
To complete this process, you will need access to a suitable SSH key generation application such as PuTTYgen
- Download the puttygen.exe executable and run it
- The default options should be SSH-2 RSA with 2048 bits, if they are different change to these values
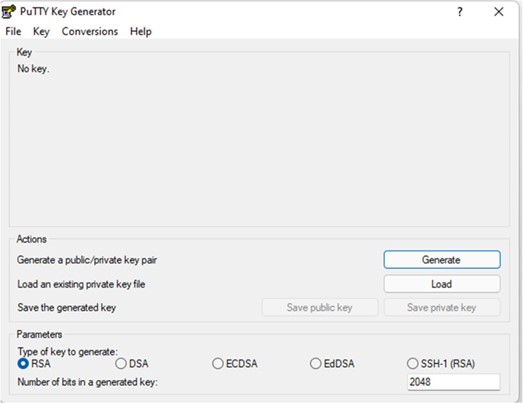
- Click the "Generate" button
- Follow the on-screen instructions to move your mouse around to generate some random data
- Optionally add a comment and passphrase to the private key
- Click "Save public key" and select a location to save this file. This file can be shared with server administrators
- Click the Conversions menu and select "ExportOpenSSH Key". This file is your private key in RSA format which will be compatible with most client software. Do not share this file with anyone and make sure it is stored in a secure location.
- Click "Save private key" and select a location to save this file. This file is your private key in Putty Private key format, compatible with Putty and PSFTP. Do not share this file with anyone and make sure it is stored in a secure location.
Technology Requirements
1. Confirmation of SFTP service
Once the site has all the information in the previous steps and provided to the TechnologyOne – installation of the SFTP service may take up to 5 days. When this is complete, TechnologyOne will confirm with the SFTP service is now installed and ready to be tested by the customer
2. Connection Detalis
Like the above, TechnologyOne will confirm the SFTP service is installed and ready to be tested.
Providing the below details:
- Host name: sydsftp01.spatial.t1cloud.com
- Port Number: 22
- Username: Username for the connection. IE, “CUSTOMERCODE”
- Authentication: Private key (this never changes and is the key which matches the public key provided)
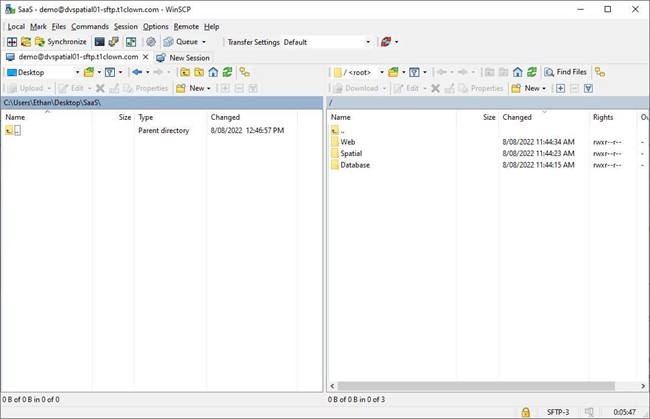
Example upload with WinSCP
Sites should upload files into the same server folders as previously used in the legacy FTP. On the new SFTP endpoint, please upload to; (Database, Spatial, Web)
Uploading via scripting can be achieved using CMD – Please refer to the WinSCP site for more detailed scripts:
https://winscp.net/eng/docs/scripts
https://winscp.net/eng/docs/script_upload_single_file
Additional Settings
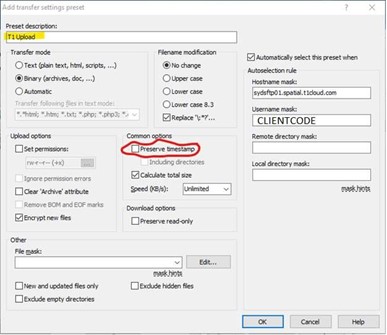
Preserving Timestamps on Uploaded Files
The Spatial Cloud SFTP end point does not support updating the timestamps of uploaded files. This can generate error messages during uploads when using the default WinSCP settings. The relevant message will be as below.
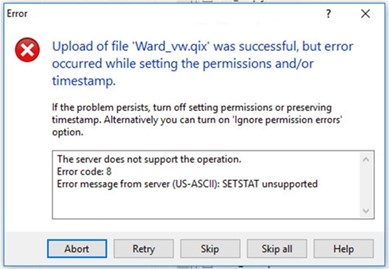
The resolution is to disable the ‘Preserve timestamp’ option for uploads to the sydsftp01.spatial.t1cloud.com sFTP end point by creating a ‘transfer settings preset’ for this end point only. This method allows the ‘Preserve timestamp’ option to remain set for any other SFPT end points you may be using with WinSC
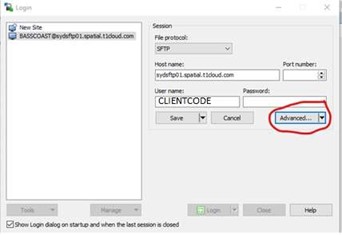
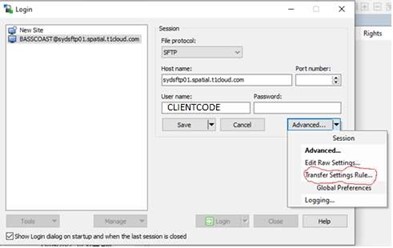
1. In the sydsftp01.spatial.t1cloud.com WinSCP login select the down arrow to the right of the ‘Advanced button.
2. Select the ‘Transfer Settings Rule’ option.
3. On the ‘Add transfer settings preset’ form under ‘Common options’ untick ‘Preserve timestamp’. On the right of the form make sure the ‘Automatically select this preset when’ option is checked, the ‘Hostname Mask’ value is sydsftp01.spatial.t1cloud.com and the ‘Username mask’ is the TechnologyOne user name for your organisation.
These are normally set automatically from the login values. Under ‘Preset description at the top left of the form enter a name for the preset and select ‘OK’